Monday, January 1, 2018

The Banjo Boys...11/22/2012

Some readers may remember my foray into the world of cigar box guitars.  That effort resulted in the instrument shown above.  Now, there's a new adventure in the works.  It all started one day when my friend Clint Rankin mentioned that his wife, Sarah, wanted to learn to play the banjo.  I said, "You ought to build her one."  That started the ball rolling.


Jenes Cottrell in the 1970s with
one of his turbine ring banjos
An internet search for various terms like "home built banjo" and "building a banjo" led us to a little-known character from the 1970s named Jenes Cottrell.  According to the West Virginia encyclopedia, "Traditional musician and craftsman Jenes Cottrell (September 14, 1901-December 7, 1980) was descended from the earliest settlers of Clay County. Known for their farming and trading, the Cottrells also worked with wood. During the arts and crafts revival beginning in the 1960s, Jenes Cottrell became one of the best-known practitioners of the old ways. He made toys, rolling pins, chairs, and canes, and he put in chair bottoms of woven wood splits. He had a fine foot-powered, spring-pole lathe which he used to demonstrate his skill at festivals throughout West Virginia and beyond. He drew people as flies swarm to sugar. Somewhere along the way Cottrell had begun to make banjo rims using aluminum torque converter rings from 1956 Buick transmissions. He quickly became known for making and playing banjos."  
The turbine ring

We then found a Website of a young man named Chris Dean who had researched Cottrell's banjos and built one of his own "Dynaflow banjos."  Then we ran across some YouTube videos of a fellow who had built such a banjo and had recorded the construction sequence and some of his playing.  Clint and I were intrigued.  If we could find the transmission part - the "1st turbine ring" from a 1953-1958 Buick Dynaflow (no easy task) - it might be fun to try building one of these instruments.  Then Monty Love joined the crowd.

Chris Dean's finished banjo

Clint is a Pit Bull in an internet quest.  Within a day, he located a junkyard in New Jersey that had a pile of Dynaflow transmissions.  Within a couple more days, there were three turbine rings on their way to Huntsville.  Watch for progress reports over the next few weeks.


We are officially the "Banjo Boys."

Sunday, December 31, 2017

12/7/2012 - Banjo Network Exchange of Information...

The community of Dynaflow Banjo builders is quite small, as far as we can tell.  Perhaps the most knowledgeable is Chris Dean, whom we cite as our inspiration for undertaking this project in the first place.  This week, we had an exchange with Chris through his blog:
  1. Chris,
    Two friends and I have acquired the hard-to-find turbine rings and are building banjos inspired by your Website. We have a few questions:
    1. How did you fasten your neck to the turbine ring?
    2. How many clamps did you use to pull down on the tensioner ring?
    3. Where did you get your head? Did you special order it to a certain diameter? How about the ring that the leather fastens to. Did you buy the head with that ring already in place or did you buy just the leather and separate rings?
    Inquiring minds want to know. We want to stick to the spirit of Jenes Cottrel. Thanks for any help you can give.
    • Hey Bob,
      Sorry for my untimely response. I wasn’t receiving notifications for the blog.
      For the neck fastening, I build the neck with a dowel instead of coordinator rods. So i cut out a square hole of one end for the dowel stick to go through, and drilled a hole on the other end for the tailpiece screw to connect intil the end of the dowel stick.
      For the hooks, I think i used 26. I took a 12″ tension hoop, cut it down and brazed it. But i haven’t done that with the other torques i’ve made. Now I do my own hoops. However the hooks don’t matter much you could go with 24 or less or more even. Jenes would do that. I someone wanted to pay $85 instead of $90 he would build it with less hooks.
      I ordered the head from elderly music. it’s 11 5/8″ and is almost always back ordered. It took me 6 months for the last. They are really the only ones that carrry wierd sizes. You could also try an 11 1/2′ renaissance head, because they typically run a littl big.
      If you have any more questions send them my way.
      -Chris


I still marvel at the way the Internet has brought us together! 

Saturday, December 30, 2017

12/8/2012 - Banjo Boys, Chapter 2

Monty Love and Clint Rankin -- 2 of the Banjo Boys -- Measure twice, cut once.
Back on November 22, I started the story of the Banjo Boys.  Today was our first official get-together to actually build anything.  Clint and Monty showed up right on time at 9:00 AM, ready to work.  I had already moved my table saw outside to minimize the amount of sawdust we would create inside the shop.  I also had my new band saw at the ready, along with my 6" belt sander.

Bob and Monty cutting a board

I had a 60-something inch long maple board that was 2 inches thick.  It was a clear gorgeous piece of hard rock maple that I have had for at least 20 years.  It needed no further seasoning.  It was about 6 inches wide, so if we cut it in half lengthwise and transversely, we'd have four perfect blanks for banjo necks.  We managed to get that far with all our digits still intact.
Clint setting up clamps
The next step was to determine how far we could angle the headstock (where the tuning pegs go) without running out of wood.  Most banjos seem to have about a 15-degree slope, and that worked out well with the thickness of wood we had to work with.  We then used my jointer (a tool I respect profoundly since it removed part of a finger a few years back) to ensure that the fretboard surface and peghead surfaces were both flat for gluing.  We also had to glue "wings on the headstock area to make it wide enough for the design we intend to use.  Each of us will end up with a slightly different banjo purely based on choices we'll make along the way -- design of the headstock, veneer material for the fretboard and peghead, mother-of-pearl inlay design, hardware choices, color of stain, etc.

We next applied the 1/4 inch thick fretboard veneer, gluing and clamping it carefully.  We amazed ourselves at how much glue can ooze out of a joint as it gets clamped, and how many ways there are to get that glue all over one's self.  After we glued the fretboard, we came in the house for a really fine lunch.  Mary Ann outdid herself with a wonderful hearty soup, Santa Fe soup, made with ground turkey, Rotel tomatoes and corn and chili seasoning.  We had that along with tortilla chips and salsa.  She followed this up with fresh (still warm) pumpkin bread for dessert.  Thanks, Mary Ann.  You helped make this a very special day. The food was perfect and the four of us also enjoyed Clint's wonderful stories about his genealogical research.


The walnut veneer on the headstock
After lunch we began on the veneer for the headstock.  Of course, every piece of wood we touched required two or three cuts and sandings,  We oozed a lot more glue as well.  Clint is using ebony that he acquired on eBay, whereas Monty and I decided upon a beautiful piece of walnut that I had saved many years ago.  I think it's going to look especially nice when the fretboard has some pearl inlay in it and is darkened by an oil finish.

We finished up and cleaned up the shop and were done by 5:00 PM.
The fruits of today's labor

Friday, December 29, 2017

12/29/2012 - Banjo Boys, Chapter 3


Today Monty came up to cut fret grooves in our "Dynaflow" banjo necks.  Clint is taking a well-earned vacation with Sarah over in Asheville, so there were only two banjo boys present and accounted for.  
Fret cross-section
During the last couple of weeks, I had built a miter box to guide the blade of my fret-cutting saw.  The saw has a couple of features that make it special.  The "kerf" or width of the blade is such that the tang of a banjo fret will fit tightly into the slot that it cuts.  Also, the saw has a device that limits how deeply into the wood it can cut.  You don't want to cut much past the depth of the fret tang.  Monty and I measured, marked, and cut each fret groove very carefully, since the position of these frets will determine the accurate intonation of the finished instruments.  Here are the results:

Thursday, December 28, 2017

1/6/2013 - Banjo Boys, Chapter 4

Clint is the student; Bob is the teacher; Pearl inlay is the subject
Today the Banjo Boys convened for another session.  We had two goals:  Fix a couple of troublesome fret slots and get started with some pearl inlay if time allowed.  We pretty much accomplished our goals.
Monty's Rose inlay
Monty and Clint arrived around 10:30.  Our first order of business was to fix the problem fret slots.  We tried a couple different ways of cutting razor-thin slices of wood to glue into the slots.  Then we glued them in and left them while we went for lunch.  When we returned, we began the delicate process of trimming off the excess wood prior to re-cutting the fret slots.  Then we turned to the subject of the pearl inlay that will decorate the Dynaflow banjos.

Monty has acquired a beautiful mother of pearl rose that he plans to inlay in his head stock.  It arrived this week.  Now all we have to figure out is how to cut out the receiving surface for such an ornate and delicate shape.  We will rout out a shallow depression in the wood into which the pearl is to be glued.  Then the pearl will be glued in place after which it will be sanded flush with the wood's surface.  The challenge is to get the edges of the depression in the wood to match the edges of the inlay with no perceptible gap.

In the meantime, Clint had designed a couple of gorgeous barn swallows to include on Sarah's banjo.  He got frustrated trying to cut the tiny pieces of pearl and trying to get all the edges to meet precisely.  He contacted a gentleman who sells precision-cut mother of pearl (M.O.P. to those in the trade), and asked him if he could craft the birds if Clint sent him image files.  The fellow (whose business is in Viet Nam) sent him a price and Clint gave him the go-ahead.  Friday, the man sent Clint a picture of the finished product.  Based on the picture, I think the finished banjo neck is going to be stunning:

Clint's barn swallows rendered in pearl and abalone
The Trishield decoration

My decoration is going to be a little more mundane.  I plan to place the so-called Buick trishield on my headstock and spell out the word B-U-I-C-K down the fretboard punctuated by a pearl star at each end.  Using the endless resources of eBay, I acquired the interior decoration from the back seat of a 1971 Buick Le Sabre and plan to use it as the head stock decoration.  I intend to use a so-called hole saw to cut the edge of a recess in the walnut to a depth of about 1/8".  Then I'll chisel out or router cut the inside of the circle to create the recess to hold the medallion.  The idea is similar to a coin or medallion album as shown here:
The recessed medallion mount

The same company that made Monty's rose also makes individual M.O.P. letters (in multiple fonts, no less!), so I ordered my letters from them and those were shipped on Friday.  As part of today's session, I held class on inlay cutting.  My first star was the demonstration item.  I'm not totally happy with it and may try to redo it at a later session.  For now, it is what it is.
The first inlay...


The Banjo Boys continue to pursue the goal of the best possible Dynaflow-based banjos in the Western World!

Wednesday, December 27, 2017

1/13/2013 - Banjo Boys, Chapter 5

Monty applying tape to his rose inlay
Today was a warm, drizzly day; a perfect day for working on Dynaflow banjos!  Monty and Clint came to the house a little before 9:00 AM.  Today was a day to complete the fixes to the fret slots begun last week, and to get started on the decorative inlay for the necks and pegheads.

These are going to be three very different and unique instruments.  Monty is decorating his in floral themes with a couple of beautiful and intricate roses.  His current plan is to use simple pearl dots as fret markers (specific frets are marked with single or double markers to help the player navigate).  Clint is making his neck with a couple of barn swallows rendered in pearl and abalone.  The remainder of the neck will be covered with various sized dots of pearl or brass with occasional 5-pointed stars.  The overall effect reminds me of the milky way in the night sky.  And my banjo has a strictly "Buick" theme, using stars and the letters B-U-I-C-K as the markers.


We started today with Monty laying out his pearl, Clint using the drill press and multiple-sized drill bits to lay out his Milky Way, and my starting to rout out the depression in which a Buick "trishield" medallion will reside on my peghead.

Clint's "Milky Way" pattern

One of the more interesting challenges arose around Monty's pearl assembly.  The pre-cut pearl from the vendor comes glued to a piece of stiff paper.  At first, we were unsure how to remove the paper without damaging the pearl, some of which is incredibly delicate.  I had gone to the pearl vendor's Web site and found a video describing his recommended process.  He sticks Scotch Tape© to the top surface of the pearl and then immerses the whole assembly - tape, pearl, and backing paper - into hot water.  The glue holding the pearl to the paper dissolves and the pearl comes free, held together by the tape!  Neither Monty nor I believed that the Scotch Tape would continue to adhere to the pearl after being immersed in water.  We did an experiment with some of my Buick letters, which were also backed up by stiff paper.  Lo and behold it worked.  The adhesive gets really gooey, but it continues to adhere to the pearl.  So by close of business, Monty had successfully gotten his fret grooves finished and had his rose fastened to his peghead.  That, too is an interesting process.

My peghead

To rout the depression where the pearl inlay is going, the craftsman needs a precise outline that matches the piece or pieces to be inlaid.  To accomplish this, the object to be inlaid is glued to the surface using Duco
 Household Cement.  Then, the builder carefully etches a line around the edge of the object using a sharp tool such as an Exacto knife.  Then a few drops of acetone are applied around the edge of the pearl.  This soaks into the glue and dissolves it, allowing the piece to be removed without breaking it.  A little chalk can be rubbed into the etched line to make it stand out, and the router is used to cut the depression inside the line.

Clint got most of his holes drilled and dots glued in place.  He also cut out the rough shape of his peghead.  I got my peghead decoration in place (though not yet glued) and my peghead shape cut out.  Mary Ann had the idea of shaping the peghead like one of the Buick shields.

And, of course, we had lunch again at Fayetteville's fabulous Chuck Wagon restaurant!

The fabulous Chuck Wagon Cafe

Tuesday, December 26, 2017

1/20/2013 - Banjo Boys, Chapter 6

How far we've progressed from the day we cut the maple blanks!
Today was another great work day for at least two of the Banjo Boys.  Monty called earlier in the week and informed me that he planned to spend today with his son Patrick.  His priorities are A-OK with the Banjo Boys' Code of Conduct.  We love the Waylon Jennings lyrics, "So you do all you can, but then you gotta let go, You're just part of the flow, Of the river that runs, Between fathers and sons."  So it was just Clint and I for the day and he arrived around 10:30 AM.

We made a quick run down to the Ace Hardware store to get some denatured alcohol.  We had bought some dark tobacco-brown wood stain that has to be diluted with alcohol.  We diluted it 10 parts alcohol to 1 part dye.  It is very dark and very fast acting.  We ran several tests on scrap wood. both maple and walnut.  We think we know how we can use this dye to darken our wood and bring out the grain.


When we finished the dye experimentation, we tackled the first band saw cut that will eventually define the overall profile of the neck.  After changing band saw blade to a much finer 1/8" blade, we "tuned" the band saw to get all the adjustments correct for the new blade.  This took about an hour.  Then, we made our cuts:


The "first cut" in shaping the necks

In the picture above, I have completed belt sanding of the back surface of the peghead, whereas Clint's is still in the rough cut stage.  The dark line on the edge of his peghead is where he intends to put an ebony veneer on the back side of the maple.  We got out the thickness sander and looked at ways in which we might be able to make a thin ebony veneer out of some left over ebony that Clint has saved.  As part of that effort, we glued a piece of ebony to a pine board that is thick enough to feed through the thickness sander.  Next week, we'll try to thin the ebony down to veneer thickness.  It should get interesting!

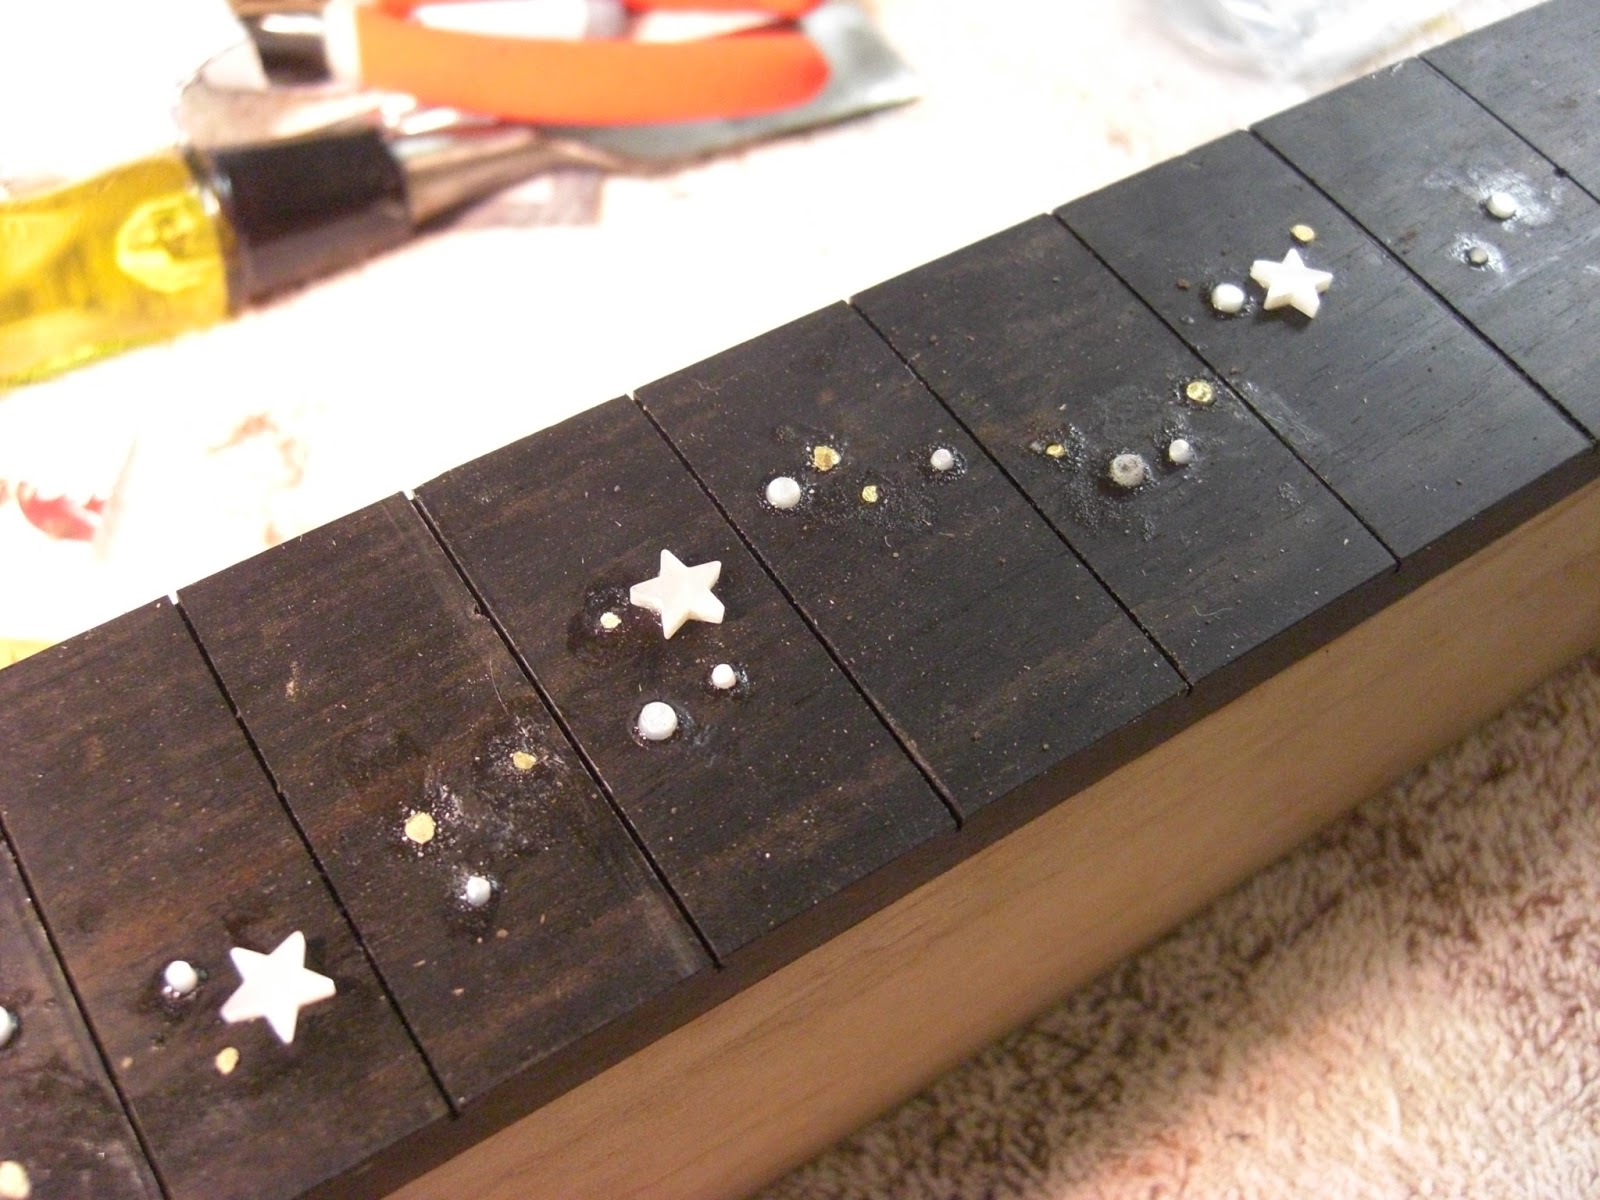
Clint had some remaining pearl and brass inlay to complete his "Milky Way" star pattern, and I had to complete the inlay of my B and U pearl letters, so we worked independently to complete those tasks.

Current status of the two necks

The last thing Clint and I did today was to cut off the neck blank at the point where it will join to the turbine ring or "pot" of the banjo.  That cut is important because it defines the position at which the bridge must be placed for the predefined string length that our fret spacing was based on.  The position of the bridge helps determine the overall sound of the banjo, including its loudness and brightness.  The neck cut also determines the angle of the fretboard and the top plane of the banjo body.  This angle affects the height of the strings above the last fret, a very important factor in the playability.  Our design showed a 1.4 degree angle from the head to the fret surface.  But in our case, the turbine ring's outer surface is angled outward at the bottom.  Here's the geometry we were hoping to get:


We set the saw blade angle very carefully, measured and marked twice, and made the cut with great trepidation.

The Banjo Boys dined at Sonic today in Hazel Green, Alabama, enjoying the latest Sonic creation, the Ultimate Grilled Bacon Cheddar Cheeseburger.  Highly recommended!

BULLETIN -- BULLETIN!!!
In a last-minute dispatch to Banjo Boy Central, Monty let us know that in spite of his absence yesterday, he made significant progress on his own this weekend.  Photo evidence shows that he cut out the profile of both his neck and headstock, and drilled the holes into which his mother-of-pearl fret markers will be glued.
The recesses for the M.O.P. dots
Monty's neck and peg head cut out -- WOW!