
 |
| Clint and Bob at work on the "death saw" |
It's been a very long time since you've heard from the Banjo Boys. Some of that silence had to do with the fact that it was too hot to work in the shop. Some had to do with distractions other than banjos. But this weekend, Clint came up to the shop to build a new jig, inaugurate a "new" tool, and to shape the heel of a banjo neck that goes back several months.
The surface of the banjo neck that attaches to the rim is critical to the proper alignment of the neck. It must first have a slight concavity when looked at from above to accommodate the convex shape of the rim. That concave profile must be symmetrical from side to side to ensure that the center line of the neck extends through the center of the rim (you want the bridge to be centered across the rim perpendicular to the axis of the fingerboard). And there is a precise tilt to the neck that ensures that with the string clearance correctly set over the frets, the bridge height on the banjo head is correct (usually around 3/8").
On our earlier banjos, we had crafted a jig that we used on a table saw. I wrote about that jig and its operation in Chapter Seven of the Banjo Boys' saga. It worked, but had a fair amount of variability in the resulting heel surface. Clint had realized that when Chris Dean built his Dynaflow banjos, he used a radial arm saw to shape the heel contact surface. It looked to both Clint and me like a much more controllable, repeatable, precise method. That led us to today's project - build the jig and shape the rim-contacting surface of the neck on Clint's latest banjo using a radial arm saw.
I acquired a non-operative radial arm saw many years ago for around fifty dollars. It was missing several pieces, including its safety guard that covers the spinning blade. Using eBay, I gradually had completed the saw but had never had a need to use it. I'm so used to doing most of my instrument work on the table saw or bandsaw, I simply never thought about using the radial arm saw, even in cases where it probably would have made more sense. So today, if all went well, I'd get to use the saw for the first time.
Clint and I studied the problem and designed the jig. We began crafting it out of some nice cherry that I had left from another project. The concept is that you would clamp the banjo neck to a flat board in a precise position that would represent the ideal 3-degree angle that the neck makes with the banjo head. Then you would align the board with the blade of the saw in such a position that the saw can be raised and lowered to chew away the unwanted wood and leave the perfectly-aligned concave surface desired.

The first job with regard to the saw was to turn its blade to a horizontal position. There's a small detent that enables the user to rotate the blade and motor. With the help of an on-line users manual, we finally discovered that detent and were able to properly align the blade. Because of the threatening appearance of a spinning 10" blade, Clint refers to this tool as the "death saw." We treat it with great respect and caution.
We calculated how high to wedge the neck, crafted a clamp to ensure the rigidity of the neck relative to the base board, and put the jig together. This process took perhaps two hours. Then we set the jig up on the saw. It looks so simple once you've figured it out, but we actually put a considerable amount of time into determining the position of the blade in relationship to a restricting fence on the saw table and other adjustments. When we were done, the setup looked like this:

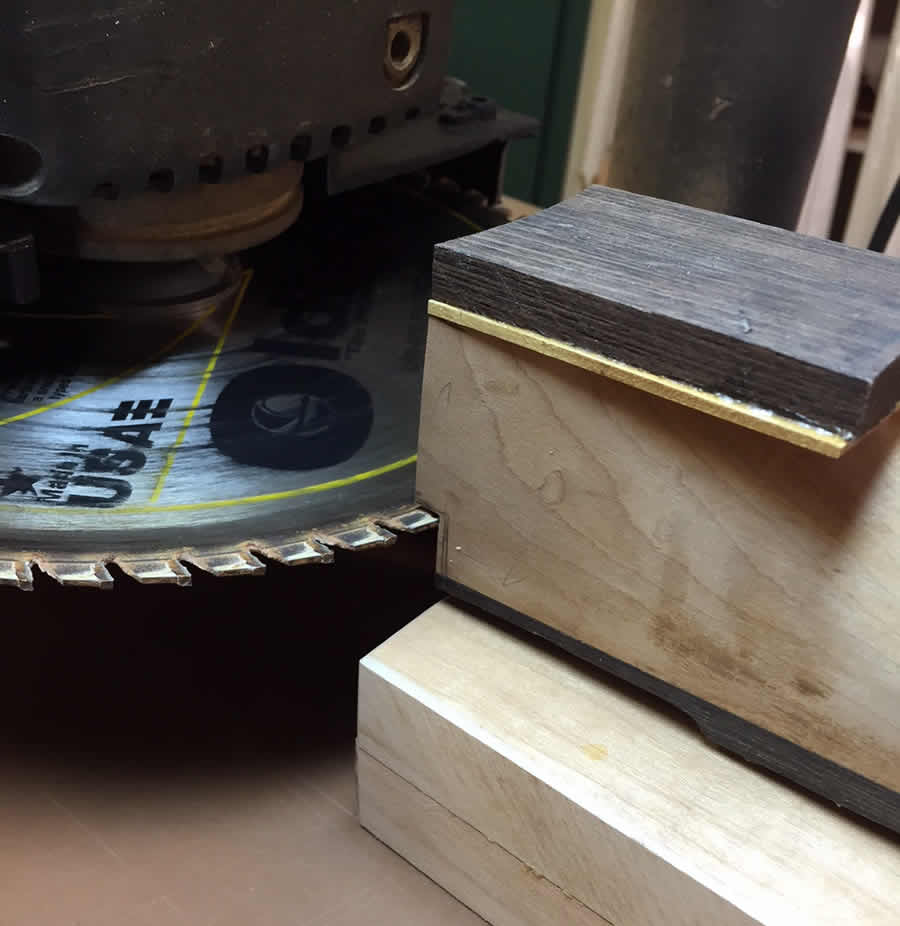
The jig is moved toward the blade until it is in a position where the blade, when raised or lowered, would eat away perhaps one-sixteenth of an inch of the exposed end of the neck. It is then raised (or lowered) through the entire height of the heel. Another small adjustment is made, moving the jig another sixteenth of an inch toward the blade and raising the blade through the height of the heel. This is repeated until the shape desired is achieved. And when the cutting is all completed, the base of the neck looks like this:

The notch at the bottom of the neck is the slot into which the flesh hoop and tension hoop will fit when the banjo is assembled. The neck is upside down in this image, clamped to the jig. The dark horizontal band is the ebony fretboard being pressed against the jig to ensure that the cut by the saw blade will hold the neck in correct alignment with the rim -- that it won't "tilt" to the left or right.
The bottom line -- We now have a system that we can reuse with consistency and accuracy in shaping the base of our banjo necks. Let's just hope it's not several months more before you hear another update.
No comments:
Post a Comment